Sunday, August 19, 2012

Yellow Braids

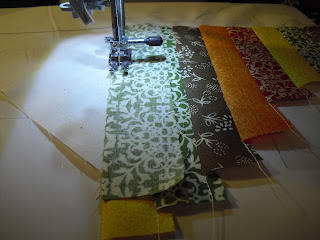
I recently purchased The Quilter's Bible by Linda Clements and I instantly became intrigued with the braided border technique.  This gave me a chance to also create a quilt in one color range.  So I gathered up the new yellows that I just purchased at Joann's and took out a couple of fat quarters and began braiding!  Today I made 5 of the braids....I am planning on making 10 braids (each with 20 blocks) and stitching them together with sashing and a border to make a quilt for my guest room.


As you can see I have all of my pieces resting on my Juki machine.  She was so tempermental today that I had to abandon her and use my Singer Quantum to piece. Each piece was 3x6.  As usual I used Masterpiece Thread in the top and Bottom Line in the bobbin.


Stay tuned for the finished product!

Great Granny Quilt Along Block #2

So it's Sunday and it's great granny block time.   For some reason this granny gave me so much trouble!  So this one is a little off but it's still workable for the larger quilt.  So here is block #2 in the series.

Wednesday, August 15, 2012

Modern Mood Quilt Week 2 ~ Get Your Mood On

What color am I today? 

Today's task is to write down my feelings based on the facts of the day and pick colors based on the mood color chart that I created in week 1.

Today's feelings
happy
elated
surreal
peaceful
safe

Facts of the day
Finished the embroidery t shirt project for the ladies in the department that I work with.
I'm jamming to some funky 70's music while I'm sewing.
No traffic on the way home from work.
I picked up some beautiful fabric at Joann's on sale!
Everyone was in a cheerful mood in my home.

One of the key points that Sherri points out in her blog is...
(and I quote)

"It’s OK to refine your chart, since you will probably discover new or shifting relationships between your emotions and color as you work through this process. You can also work in reverse order. Choose the colors you are intuitively drawn to that day. Nothing is set in stone."

Now that's my kind of woman....being flexible and thinking outside the box is the answer to so many of life's challenges.  So with that in mind I am revising my chart so that it is more inclusive. 
Here's my updated chart.

  • BLACK: strength, bold, daring, confident, power/positive
  • GREY: dull, dismal, classic/negative
  • GOLD: regal/positive
  • LIME GREEN: frazzled/negative
  • GREEN: abundance, fruitful/positive
  • BLUE-GREEN: wishy-washy, unstable, psychadelic/negative
  • BLUE: calming, cool/positive or negative
  • DARK-BLUE: bold, commanding, decisive/positive
  • WHITE: simplicity, carefree/neither positive or negative
  • BROWN: comforting, nostalgic, nuturing, grounded/positive
  • BRONZE: strength/positive
  • YELLOW: joyful/positive
  • ORANGE: warm, cozy, comfortable/positive
  • RED: passionately powerful, aggressive, rage/both positive & negative
  • PINK: fantasy, dreamy, girlee (femine) /positive
  • PURPLE: royalty, energy/positive

  • So my colors for today are:
    BROWN
    YELLOW
    ORANGE

    Stay tuned for week three....

    Sunday, August 12, 2012

    The Great Granny Quilt Along

    In my piecing journey...I find myself drawn to blocks that use 2 1/2 inch squares. After surfing through some quilt blogs and came across The Great Granny Along at the A Bee in my Bonnet Blog by Lori Holt. It's a great block to put together on a lazy Sunday afternoon.  I decided to use the the fabrics from the medallion project to test my skills on this new block. I used my Sixxiz to cut out the squares.....I do have an Accuquilt, but I find that the Sizzix cuts all the way through!  As always I used Bottom Line in the bobbin and Masterpiece on the top.  I used the June Tailor Get Squared Ruler to edge up my block. 
    So here it is...


    So one down and eight more to go!!!!  See you next Sunday Granny!

    Tuesday, August 7, 2012

    The Process Pledge

    When I first started this blog I meant to start with this entry....but the excitement of getting my blog up and published sidetracked me.  So here it is...the mission of the Not Sew Serious Gal

    The Process Pledge
    I, Marcella (the not sew serious sew gal), strives to blog about my quilting processes even when I can’t quite put them in the in technical terms because my quilting is an artistic expression not a study in the art of quilting.    

    I saw the concept of the Process Pledge on Rossie Blog.  Her blog states that:
    "The goal of the process pledge is to create a new sensibility in quilting blogs where we don’t just show finishes or occasionally confess about our moments of indecision, but chat openly and often about our works in progress, our inspirations, and our moments of decision."

    Medallion---WIP(work in progress)

    Okay so I love using muslin as a foundation and piecing fabric on it to make my quilt blocks.  It gives the quilt so much more stability and weight.  So I decided to to try designing a quilt that looks like a medallion (one of those pretty floor tiles in grand entrance ways).  As a kid I was always in awe of these tile masterpieces. 

    What I used: 

    Books (design refernce):  String Quilt Revival by Virgina Baker & Barbara Sanders---I Got the Blues Pattern and The Quilter's Bible by Linda Clements----for the Seminole Border.


    Fabric:  I started with 7 fabrics from various collections and shops (Walmart, Joann's and Hancock Fabrics) that I pulled out of my stash.  My inspiration fabric was the top one with all the colors and a medallion design incorporated in the fabric. 

    Thread:  Masterpiece 152 by Superior Threads in the top and Bottom Line 623 by Superior Threads in the bobbin.

    Machine:  Piecing completed on my Juki F400


    Draw a line bisecting the 10 inch muslin square  from corner to corner.


    Place the initial strip (I cut all my strips 2 inches) from the middle of the line you drew to the opposite angle.

     Fold over and press.


    Add you second strip, fold over and press.

    I decided to work my colors out so that they were somewhat symmetrical.


    After sewing the strips....cover up the midsection of the square with a contrasting fabric. 

    Next sew on your triangle (it is a one half of a 9x9 square).


     Now trim and cut from the back to remove the excess fabric and square up your block.

    Then I used my design board (thanks Nikki for making this!)  to place the blocks together.


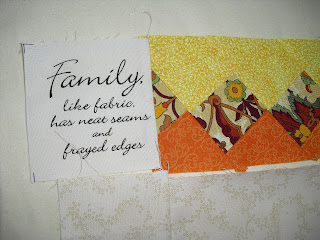
    Making a seminole border (this is my first one!)....


    Adding my family fabric for the cornerstones.

    So here is the the preliminary stitching of the medallion.

    Stay tuned.....as I am deciding how I want to move forward with this design (another WIP!). 

    Modern Mood Quilt---Week 1 ~ Get Your Chart On

    I love reading other quilting blogs....that's where 50% of my quilting inspiration comes from.  I was blessed to come acroos a blog by Sherri Lynn Wood  (original post date:  June 5, 2010) about a Mod Mood Quilt Along and I've decided to give it a try. From the looks of it, it seems like a great expressive arts therapy technique that I may be able to incorporate later on as I continue working on my therapist license. 

    There are 10 steps to the process, so I've decide to to complete one step each week. 
     
  • Step 1: Get Your Chart On
  • Step 2: Get Your Mood On
  • Step 3: Get Your Pattern On
  • Step 4: Get Your Line On
  • Step 5: Get Your Puzzle On
  • Step 6: Get Your Curve On
  • Step 7: Get Your Bias On
  • Step 8: Get Your Stitch On
  • Step 9: Get Your Binding On
  • Step 10: Get Your Quilt On ~ Mod-Mood Quilt, Summer 2010


  • Week 1 ~ Get Your Chart On

    picture downloaded from daintytime blog website by Sherri Lynn Wood

    My color perception and association
    Q1:  How do I respond to and use color? 
    A1:  I will say that I love color when it is used in a modern, contemporary fashion.  I'm not one for whimsical styles in which color is allowed to "run wild".  I like quilting with fabrics that coordinate as opposed to being contrasting.  I love neutrals, browns, and pinks---typically these are the types of fabrics that I'm drawn too when I'm in the quilting shops.  I prefer quilting with no more than 5-6 different types of fabrics because I really feel that the beauty of fabric can be lost in a quilt when it has to compete with so many colors/patterns. 

    Q2:  How do you preceive color and what do you associate it with? 
    A2:  My color associations/perceptions are as follows...
    • BLACK:  strength/positive
    • GREY: dull/negative
    • GOLD: regal/positive
    • LIME GREEN: frazzled/negative
    • GREEN: abundance/positive
    • BLUE-GREEN: wishy-washy, unstable/negative
    • BLUE: calming/positive
    • DARK-BLUE: bold/positive
    • WHITE: simplicity/neither positive or negative
    • BROWN: comforting/positive
    • BRONZE: strength/positive
    • YELLOW: joyful/positive
    • ORANGE: warm/positive
    • RED: passionately powerful/both positive & negative 
    • PINK: fantasy, dreamy/positive
    • PURPLE: royalty/positive


    Monday, August 6, 2012

    Design Originals Book, 10-Minute Blocks


    About a month ago I felt like trying out a new quilting technique.  So I perused through You Tube and found a video about the 10 minute block (check it out). So me being the short attention span type of person that I am...I decided to give it a try...but instead of layer cakes I decided to use charms that I picked up on clearance (of course) at Walmart.  Take a look at my experimentation. 


    So now I have a bunch of 10 minute blocks to transform into a quilt.  Another UFO (unfinished object) is born!

    Monday, July 23, 2012

    "CHOP CHOP" Chef Aprons

    To break in Missy Q, I decided to use her to make aprons for the students in my cooking class that I taught the past two weeks.  So last weekend with the help of my sewing buddy Nikki I pulled out one of my sewing for dummies patterns (because my confidence level in garment making is a negative 10!).  Even though it was one of those....it's so easy....I will admit that I stopped following the directions early on.  Yeah me and direction following are like oil and water...we don't mix well!  To simplify my project I choose to make the apron with one pocket instead of two.


    To help Missy Q out, her big sister, Futie (Futura XL-400) did all the embroidering because I had a wild hair up my butt to personalize each apron!  I was glad I did it that way because my husband got a chance to see the benefits of having multiple machines...and I was able to multitaskcraft without having to consantly change settings!


    I had my son (who is home from college) cut out the apron so I could begin my "sweat shop" sewing!
    I had come upon this sewing novelty fabric at Joanns---of course bought on sale and with my teacher's discount.  What you see here is the front pocket with bias tape for the finishing.


    So here it is my first completed project on Missy Q! 


    My colleague, Tashua Woodham whom assisted throughout the entire two weeks at the cooking camp was one of the apron recipients.

    Sunday, July 22, 2012

    The new baby arrived!

    Last week the baby arrived.....the Singer Quantum 9960!
    The third baby in my sewing machine collection found her spot next to my Juki Quilt & Pro. 


    My Quantum will be used for sewing garments and my traveling machine.  I've broken her in and I must say this baby runs so quietly and smoothly that I feel like the sewing machine has a luxury car engine and chasis!  Of course my first project on my machine is the stitch sampler.  The machine is equipped to produce 600 built-in stitch patterns including five alphanumeric fonts and 13 fully automatic one-step buttonholes.  Well I will say that after sewing four 7x10 blocks of stitches.....I still have not utilized every single stitch for the sampler!  Will I ever use all 600 stitches....who knows....but it makes for a nice challenge.  I did do days upon weeks of reading reviews, pouring over websites, and checking the machine out in it's flesh at the local sewing store before making the purchase. 

    The 5 pros that I loved about this machine are:

    1.  The abundance of pressure feet that came along with the machine.

    All purpose foot
    Zipper foot
    Button sewing foot
    Satin stitch foot
    Buttonhole foot with underplate
    Open toe foot
    Blind hem foot
    Overcasting foot
    Narrow hem foot
    Cording foot
    Quarter inch foot
    Darning and embroidery foot
    Even feed foot
    Adjustable Bias Binder Foot
    Single Welt Cording Foot
    Braiding Guide
    Braiding Foot
    Clear Stitch-in-Ditch Foot
    Fancy Trim Foot


    2.  Lucky for me the bonus sewing feet came with these handy dandy info sheets....perfect for the novice sewers like myself who really don't know the purpose is for the different sewing feet!


    3.  The bobbins are the same for my Quantum as the Futura!

    4.  It is a compact machine with a larger sized machine capabilities!

    5.  Machine case and extended table came with the purchase!

    Now for the con:
    The only problem that I have had is that the needle threading is a bit frustrating and time consuming compared to the big sisters Futura and Juki that I currently have. 

    The next test will be the traveling component.....I'm taking a little road trip and will bring Missy Q (her pet name) with me to do some quilt piecing!